How to Clean Antique Oil Paintings Safely at Home
Antique oil paintings carry not only financial value but also immense historical, cultural, and emotional significance. Over time, however, they inevitably collect layers of dust, dirt, smoke residue, and even yellowing varnish that obscure their beauty. Many art enthusiasts, collectors, and homeowners wonder whether it’s possible to clean these treasures at home without causing irreversible damage.
The truth is: cleaning an oil painting requires patience, knowledge, and the right materials. Done improperly, a simple attempt to brighten a painting can strip away paint, dissolve varnish, or create permanent streaks. But with the right guidance, light cleaning at home is possible and can restore vibrancy without compromising the integrity of the artwork.
In this complete guide, you’ll learn:
The science behind oil paintings and why they get dirty
When it’s safe to clean a painting yourself (and when not to)
Step-by-step methods for gentle cleaning at home
Tools and materials you need
Mistakes to avoid
Professional alternatives and preventative care
By the end, you’ll know exactly how to approach cleaning your antique oil paintings safely, preserving them for generations.
Understanding Antique Oil Paintings
Before touching your painting, it’s essential to understand its construction and vulnerabilities.
1. What Makes Oil Paintings Unique
Oil paint consists of pigments suspended in a drying oil, typically linseed oil. Once applied to a canvas or wooden panel, it slowly oxidizes and hardens over decades. Many antique paintings also have a layer of natural resin varnish (such as damar or mastic), applied to protect the surface and enhance colors.
Unlike acrylic or watercolor paintings, oil paintings are:
Sensitive to solvents – Harsh chemicals can dissolve paint or varnish.
Prone to cracking – Age causes brittleness, making surfaces fragile.
Affected by humidity and temperature – Environmental changes can warp or flake the surface.
2. Why Antique Paintings Get Dirty
Several factors contribute to surface grime:
Dust and airborne particles from decades of exposure.
Nicotine and smoke residue from candles, fireplaces, or cigarettes.
Cooking oils and household pollutants that adhere to varnish.
Oxidized varnish that yellows and darkens with age.
This accumulation obscures colors, dulls brightness, and can make the painting look lifeless.
Should You Clean Antique Oil Paintings at Home?
This is the most crucial decision. While light cleaning is safe for many paintings, some require professional restoration.
Signs You Can Safely Attempt Cleaning
The painting is structurally stable (no flaking, crumbling, or lifting paint).
The canvas is firmly attached to its stretcher.
The surface dirt appears superficial (dust, cobwebs, or a light layer of grime).
You only intend to remove surface dust, not yellowed varnish.
Signs You Should Call a Professional Conservator
The paint is cracking, flaking, or lifting.
The varnish is heavily yellowed or opaque.
There are mold spots, water damage, or insect infestations.
The artwork is extremely valuable or historically important.
Attempting to clean a fragile or damaged piece at home could permanently reduce its value. When in doubt, consult a professional.
Materials You’ll Need for Safe Cleaning
To clean an oil painting safely at home, gather gentle, non-abrasive supplies:
Soft natural-bristle brushes (sable or goat hair) for dusting
Microfiber cloths or lint-free cotton pads
Distilled water (tap water contains minerals that may damage surfaces)
Neutral pH cleaning solution (optional: mild soap such as conservation-grade Orvus paste)
Cotton swabs for spot testing
Nitrile gloves to prevent skin oils transferring
Good lighting and magnification (a desk lamp or magnifying glass)
Avoid: paper towels, household cleaners, alcohol, vinegar, nail polish remover, or anything abrasive.
Step-by-Step: How to Clean Antique Oil Paintings at Home
Now that you understand the basics and have the right tools, let’s go through the cleaning process step by step.
Step 1: Prepare the Workspace
Choose a clean, stable, and dry environment with neutral lighting.
Place the painting flat on a padded surface or table.
Ensure you have good ventilation but no direct drafts.
Step 2: Inspect the Painting Carefully
Look for:
Loose paint or flaking areas
Tears or punctures in the canvas
Unusual textures, varnish bubbles, or mold spots
If you spot any of these, stop and consult a professional.
Step 3: Dry Dusting
This is the safest and most effective way to improve a painting’s appearance.
Use a soft natural-bristle brush (avoid synthetic bristles).
Gently sweep across the surface in one direction, never pressing hard.
Hold the painting at a slight angle so dust falls away rather than resettling.
Avoid brushing edges where paint may be more fragile.
This simple process often removes years of dust and improves clarity.
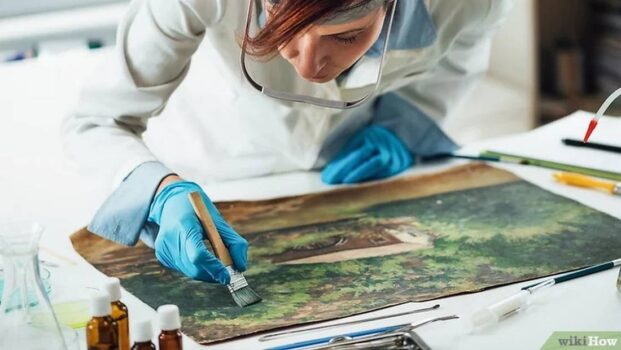
Step 4: Surface Cleaning with Distilled Water
If the painting is still dull, you may attempt very gentle wet cleaning.
Dampen a cotton swab with distilled water (never soak it).
Test a small, inconspicuous corner of the painting.
Roll the swab lightly across the surface, do not rub.
If no pigment lifts onto the swab, proceed carefully with small sections.
Always dry immediately with a second swab.
This method can remove surface grime like smoke residue without harming paint.
Step 5: Mild Soap Solution (Optional)
For slightly heavier dirt:
Mix a tiny amount of conservation-grade soap (like Orvus paste) with distilled water.
Apply using a damp cotton swab in circular motions.
Rinse immediately with a fresh swab dipped in distilled water.
Never allow soap to dry on the surface.
Step 6: Stop Before Varnish Removal
Many guides online suggest using solvents to remove yellowed varnish. However, this is not recommended for home cleaning. Removing varnish requires precise chemical control and deep knowledge of solvents, mistakes can strip paint irreversibly.
Common Mistakes to Avoid
Using household cleaners like Windex, vinegar, or alcohol. These dissolve varnish and paint.
Over-wetting the surface, too much water can seep into the canvas, causing warping.
Scrubbing instead of rolling a swab gently.
Skipping the test patch, always test before cleaning larger areas.
Attempting varnish removal at home.
Remember: less is more. Your goal is to refresh the painting, not to make it look brand new.
Alternative Home Methods for Gentle Cleaning
1. Bread or Potato Method (Traditional, but Risky)
In the past, people used the inside of white bread or a sliced potato to lift dirt. While this works superficially, it can leave starch residues that attract mold. This is not recommended for valuable antiques.
2. Conservation Wipes
Some conservation supply stores sell specialized wipes designed for art cleaning. If you use them, follow instructions carefully and always test first.
When to Seek Professional Help
Even after dusting and light cleaning, some paintings remain darkened or yellowed due to varnish. Professional conservators can:
Use customized solvent gels to remove old varnish safely
Consolidate flaking paint
Repair tears or holes
Re-stretch canvases or reline weakened fabric
Apply new protective varnish layers
Professional cleaning is more expensive, but it protects both the painting’s beauty and its market value.
Long-Term Care and Preventative Measures
After cleaning, prevention is the best way to preserve your antique oil paintings.
1. Proper Display Conditions
Keep paintings out of direct sunlight to prevent fading.
Maintain stable humidity (40–55%) and temperature (18–22°C / 65–72°F).
Avoid hanging near fireplaces, kitchens, or bathrooms.
2. Protective Framing
Use archival backing boards to prevent dust and moisture.
Consider UV-protective glass for high-value works (but allow air circulation).
3. Routine Maintenance
Dust frames and surfaces gently every few months with a soft brush.
Avoid touching the surface with bare hands.
4. Professional Check-Ups
Have valuable pieces inspected by a conservator every 5–10 years.
Consider periodic varnish renewal for paintings older than 50 years.
Frequently Asked Questions (FAQs)
1. Can I use olive oil or baby oil to refresh an oil painting?
No. Oils penetrate the paint layer, darken over time, and cause irreversible damage.
2. What’s the easiest safe cleaning method?
Dry dusting with a soft natural-bristle brush is the safest first step.
3. How do I know if varnish needs removal?
If the painting looks yellow, brown, or has a cloudy film even after surface cleaning, the varnish is likely the culprit. At that stage, call a professional.
4. Is saliva safe for cleaning paintings?
Conservators sometimes use their own saliva in controlled conditions, as it contains mild enzymes. However, it’s not recommended for amateurs due to hygiene and risk factors.
5. Can I clean oil paintings on wood panels the same way?
Yes, but be extra cautious, wood can warp with moisture. Use only dry dusting unless professionally advised.
Antique oil paintings are more than decorations, they are cultural artifacts and often treasured family heirlooms. Cleaning them at home should always prioritize preservation over appearance. While dry dusting and gentle surface cleaning with distilled water can safely refresh many works, deeper restoration (such as varnish removal or paint consolidation) should be left to trained professionals.
By approaching the process with patience, the right materials, and an understanding of your painting’s unique needs, you can safely restore clarity and vibrancy while preserving its authenticity and value. image/ wikihow